
CISEL DevOps Technical Bootcamp #1

Bootcamp environment presentation
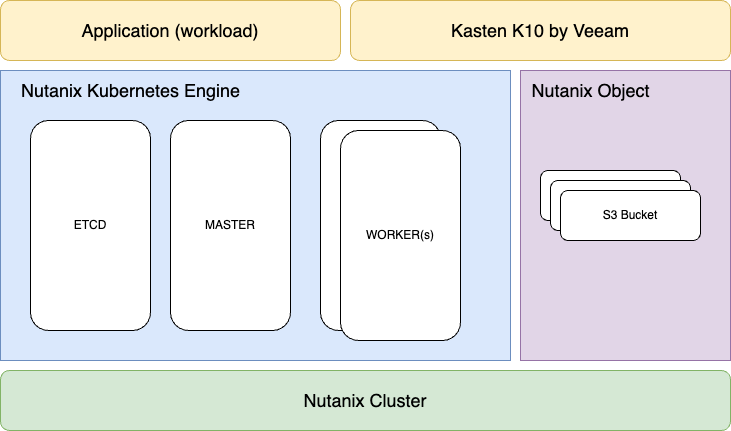
Below we can see the technology stack that we will use for this bootcamp. NKE (Nutanix Kubernetes Engine) is deployed on top of Nutanix AHV using Prism Central. NKE is composed of ETCDs as well as Master and Worker nodes. The worker nodes are those who host cloud native applications. Nutanix object will be used as an S3 storage provider.
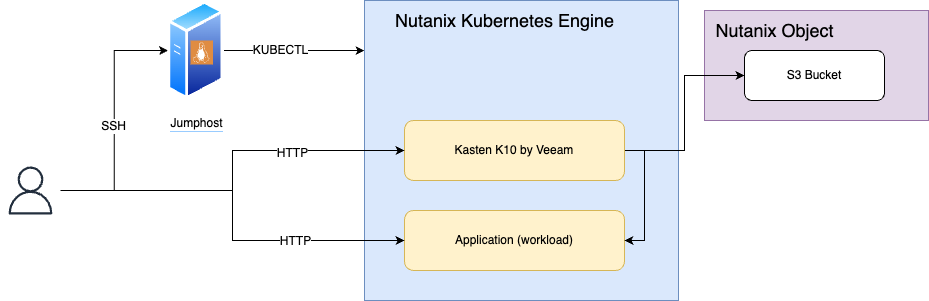
To interact with the kubernetes cluster through kubectl (CLI), you will have to first connect via ssh to the jumphost who contains all the needed binaries and configurations. Kasten K10 will be used as a cloud native backup solution and will export backup data to an S3 bucket provided by Nutanix object. Note that Kasten K10 web interface and our application example will be reachable directly via a web browser.
Lab Access Methods
Parallels VDI
- Login to https://phx-ras.xlabs.nutanix.com (for PHX) or https://dm3-ras.xlabs.nutanix.com (for RTP) using your supplied credentials
- Select HTML5 (web browser) OR Install the Parallels Client
- Select a desktop or application of your choice.
Frame VDI
- Login to https://console.nutanix.com/x/labs using your supplied credentials
- Select the most applicable Datacenter launchpad for the clusters you will be accessing or modify an existing selection using the breadcrumb menu at the top-center of the page
- Launch desktop For further guidance on features like clipboard sync, Frame file transfers, etc. SEs can reference: Frame Tips
Pulse Secure VPN Client
- If client already installed skip to step 5
- To download the client, login to https://phx-vpn.xlabs.nutanix.com or https://dm3-vpn.xlabs.nutanix.com using the supplied user credentials
- Download and install client
- Logout of the Web UI
- Open client and ADD a connection with the following details:
Type: Policy Secure (UAC) or Connection Server(VPN) Name: X-Labs - PHX Server URL: phx-vpn.xlabs.nutanix.com
OR
Type: Policy Secure (UAC) or Connection Server(VPN) Name: X-Labs - RTP Server URL: dm3-vpn.xlabs.nutanix.com
Once setup, login with the supplied credentials
Deploy NKE Cluster
Connect to your cluster using the "Nutanix Cluster" IP.
From then you can jump to the Prism Central that manage our cluster.
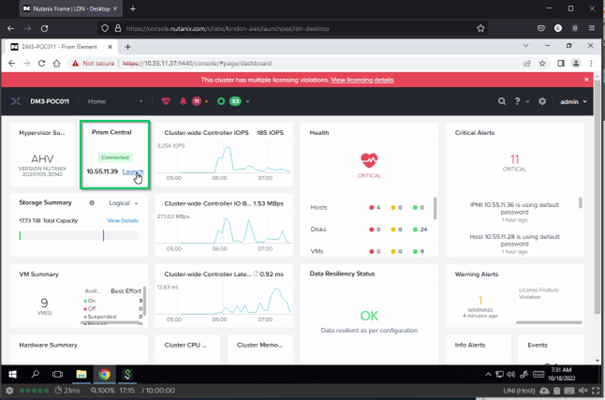
When you are on the Prism Central, click on the Burger Menu, click Services, click Karbon (Kubernetes). You can click on the start to add it to your favourites.
Setup Karbon
- Enable Karbon
- Download OS Image Wait for to the end of the image download and service activation. You can follow the status of the operations in the Tasks Dashboard Up right.
Create a Kubernetes Cluster
- Select Development Cluster (This is for demo ressources impact) / Next
- Enter a name, as provided in Resources lab document, and select your corresponding Nutanix Cluster / Next (leave Kubernetes Version and Host OS out for now)
- Set the "Kubernetes Node Network" to Primary and the number of workers to 2 / Next
- leave the default options / Next
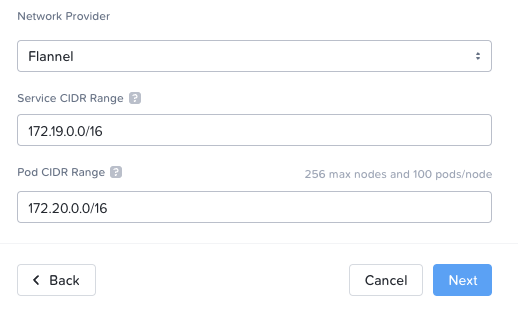
- Set the "Cluster Username" and "Cluster Password" as provided in Resources lab document. / Next
- Wait for to the end of the cluster creation. You can follow the status of the operations in the Tasks Dashboard Up right.
Hint : Wait for the deployment completion. It will take around 15 minutes to complete, go to the next section in the meanwhile
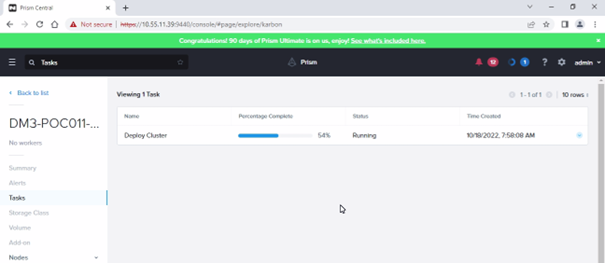
Connect to your NKE Cluster
Connect to the linux jumphost (with putty and username: yourusername (example userxx) pw: nutanix/4u)
Use this link to install putty on your machine if not already present : https://the.earth.li/~sgtatham/putty/latest/wa64/putty-arm64-0.77-installer.msi
When your cluster is fully deployed, you can then connect to it using kubectl
- Go to Prism Central, click on the Burger, Services, Karbon
- Cluster Clusters / Select your cluster / Actions / Download KubeConfig Copy the command to clipboard
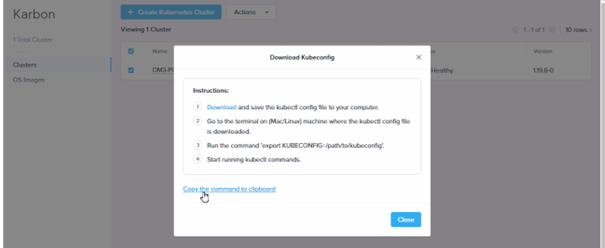
Paste the command into the console (on the jumphost) and press ENTER, then try to connect using kubectl. kubectl is a binary used to interact with kubernetes cluster, it is pre-installed on the jumphost.
kubectl get nodes -o wide
output:

Deploy MetalLB via Helm
We will need to install the MetalLB service in the cluster to act as a LoadBalancer for the services. It will give IP address to the services so we can reach them.
First, deploy mettallm using helm with the commands below:
kubectl create ns metallb-system
helm repo add metallb https://metallb.github.io/metallb
helm install metallb metallb/metallb -n metallb-system
kubectl create secret generic -n metallb-system memberlist --from-literal=secretkey="$(openssl rand -base64 128)"
kubectl -n metallb-system get all
Then, find the IP range allowed for your instance as provided in Resources lab document.
Create the metallb configuration, be careful to adapt the line x.x.x.x-y.y.y.y with the information as provided in resources lab document, in the field Karbon MetalLB Pool.
cat <<EOF | kubectl apply --filename -
---
apiVersion: metallb.io/v1beta1
kind: IPAddressPool
metadata:
  name: my-kube-ippool
  namespace: metallb-system
spec:
  addresses:
  - x.x.x.x-y.y.y.y
---
apiVersion: metallb.io/v1beta1
kind: L2Advertisement
metadata:
  name: l2
  namespace: metallb-system
EOF
Restart the metallb controller
kubectl -n metallb-system scale deployment.apps/metallb-controller --replicas=0
kubectl -n metallb-system scale deployment.apps/metallb-controller --replicas=1
Check the MetalLB deployment
kubectl -n metallb-system get pods
you should see 4 pods running:

Deploy Wordpress
We will use the deployment below as a demo application that we will modify/delete and then restore with Kasten in next steps.
cat <<EOF >./kustomization.yaml
secretGenerator:
- name: mysql-pass
  literals:
  - password=YOUR_PASSWORD
resources:
  - https://raw.githubusercontent.com/cisel-dev/bootcamp-demo/main/wordpress-mysql-deployment.yaml
EOF
kubectl create ns wordpress
kubectl apply -n wordpress -k ./
Check that all the pods are running and verify that the service get an External-IP Address in the range specified in MetalLB
kubectl -n wordpress get pods
kubectl -n wordpress get svc
 You can access the Wordpress interface using http
 http://External-IP and finalise the installation using the Wordpress process.
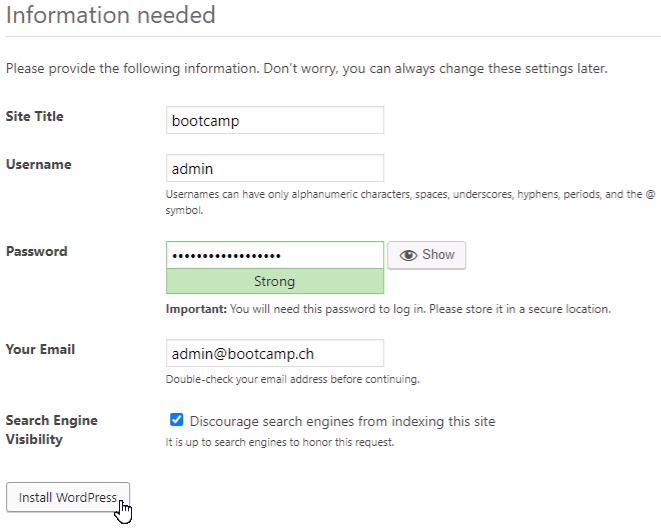
Configure Nutanix Objects (Already done on your Lab)
Create Object Store
!!!! --- This "Create Object Store" section is a showcase, do not click on create, and click cancel afterwards, as an object store has already been created for you. --- !!!!
With Google Chrome, connect to the Prism Central , click on the Burger Menu,click Services, click Objects
- Click Create Object Store / Continue
- Enter an object store name based as provided in Resources lab document / next
- Select performance (Estimated) to Custom. It will deploy a very small object instance to save cluster resources for other LAB participants.(don’t change vCPU or Memory)
- Set 100 GiB as capacity / Next
- Select your corresponding Nutanix Cluster
- Select Managed-Network for both Object Infra Network and Objects Public Network. Enter the Objects Infra IPs and Object Public IPs with the information provided in Resources lab document. Hint: The creation of an object store is time-consuming and not feasible in this time with parallel staging
Create Objects Access Key
On Prism Central, click on the burger menu, services, Objects. Choose the "Access Keys" tab.
- Click Add People
- Select "Add people not in a directory service"
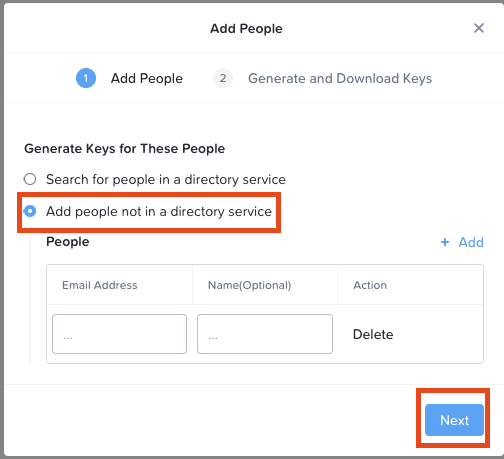
- Enter your "Email address" / Next
- Click Next
- Click on "Generate Keys"
- Download the Keys / Close
Create Bucket and grant access
Go back to the "Object Stores" tab and click on ntnx-objects object store. You will be redirected to the Nutanix Objects dedicated web page.
- Click on "Create Bucket"
- provide your userxy followed by "-bucket" (for example user8-bucket), keep default values and click "Create"
- Click on your newly created Bucket to open the configuration panel
- Go to "User Access" and click "Edit User Access"
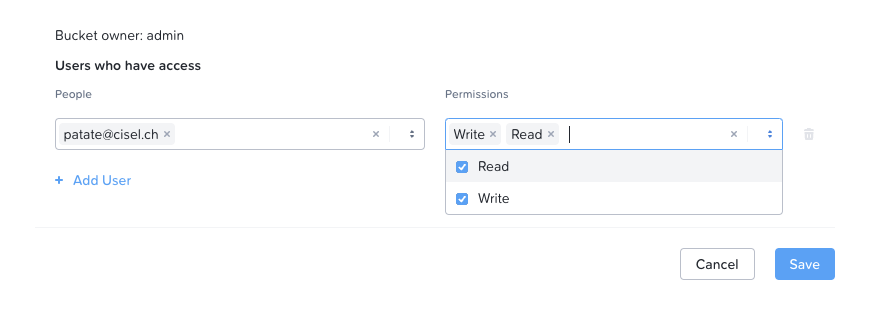
- Add your user email address and give it Read and Write permissions / Save
Deploy Kasten
Prepare the cluster
Add Kasten helm repo
helm repo add kasten https://charts.kasten.io/
helm repo update
We need to setup this VolumeSnapshotClass before Kasten installation as a prerequisite. This is not needed in newer version of Karbon.
SECRET=$(kubectl get sc -o=jsonpath='{.items[?(@.metadata.annotations.storageclass\.kubernetes\.io\/is-default-class=="true")].parameters.csi\.storage\.k8s\.io\/provisioner-secret-name}')
DRIVER=$(kubectl get sc -o=jsonpath='{.items[?(@.metadata.annotations.storageclass\.kubernetes\.io\/is-default-class=="true")].provisioner}')
cat << EOF | kubectl apply -f -
apiVersion: snapshot.storage.k8s.io/v1beta1
kind: VolumeSnapshotClass
metadata:
  name: default-snapshotclass
  annotations:
    k10.kasten.io/is-snapshot-class: "true"
driver: $DRIVER
parameters:
  storageType: NutanixVolumes
  csi.storage.k8s.io/snapshotter-secret-name: $SECRET
  csi.storage.k8s.io/snapshotter-secret-namespace: kube-system
deletionPolicy: Delete
EOF
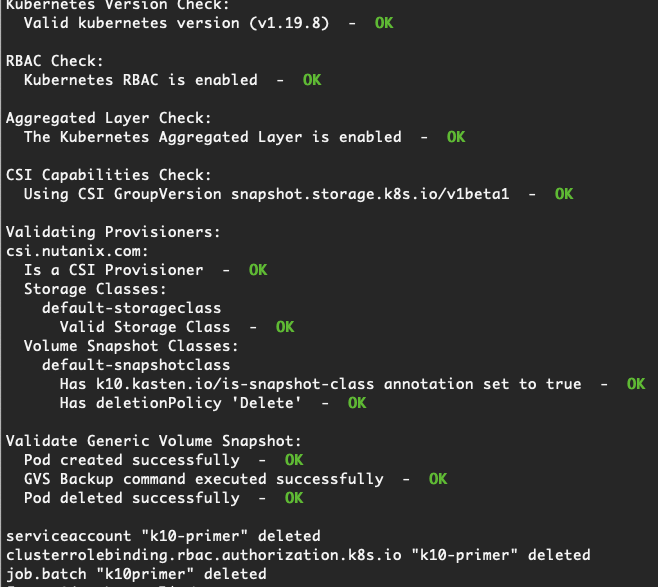
Now we will launch a precheck script provided by Kasten to be sure all the prerequisite are present
curl -s https://docs.kasten.io/tools/k10_primer.sh | bash
The ouput should be OK for every step:
Install Kasten K10
Add the repo and install Kasten using Helm with authentication and LoadBalancer type
helm repo add kasten https://charts.kasten.io/
helm repo update
kubectl create ns kasten-io
helm install k10 kasten/k10 --namespace=kasten-io --set externalGateway.create=true --set auth.tokenAuth.enabled=true
Wait for all the pods in Running status
kubectl -n kasten-io get pods
Get the Kasten gateway-ext service External-IP
kubectl -n kasten-io get svc gateway-ext
Get the Authentication Token and try to connect
sa_secret=$(kubectl get serviceaccount k10-k10 -o jsonpath="{.secrets[0].name}" --namespace kasten-io)
kubectl get secret $sa_secret --namespace kasten-io -ojsonpath="{.data.token}{'\n'}" | base64 --decode
Connect to Kasten using http://External-IP/k10/#/ and the previous Token.
Enter an email and a Company name to access the dashboard.
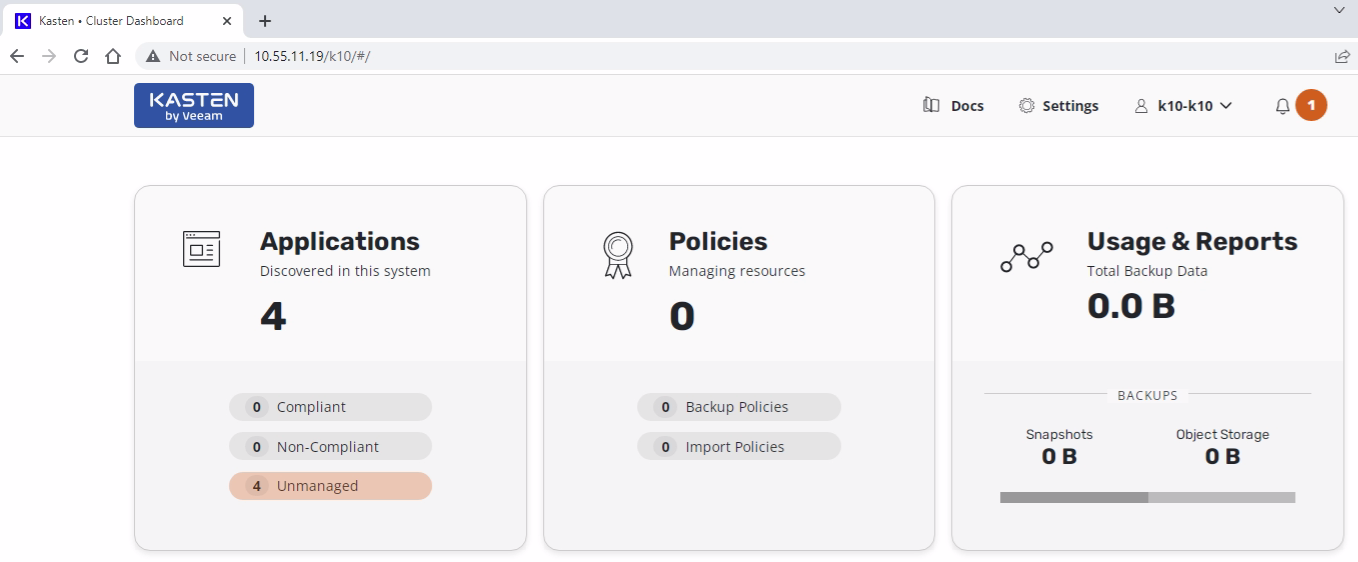
You can also access the Kasten Dashboard using the kubernetes port-forward command below and access the local URL : http://127.0.0.1:8080/k10/#/
kubectl -n kasten-io port-forward service/gateway 8080:8000
Configure Kasten Location Profiles
We need a "location profile" to export local snapshot to an external storage location
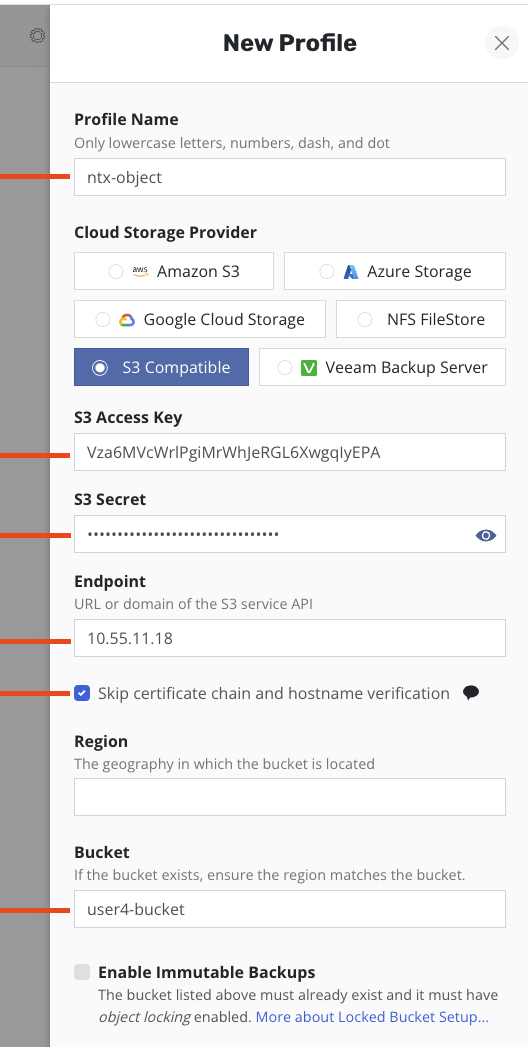
- Go to Settings, Locations and click "New Profile"
- Set a name and select "S3 Compatible"
- Use the previously downloaded S3 information from nutanix object to connect to your Objects Bucket
- Use the "Objects public IP" (found on PC / Service / Object) for the "Endpoint" field

- Check the box "Skip certificate chain and hostname verification"
- Let blank the field "Region"
- Set the name of your bucket
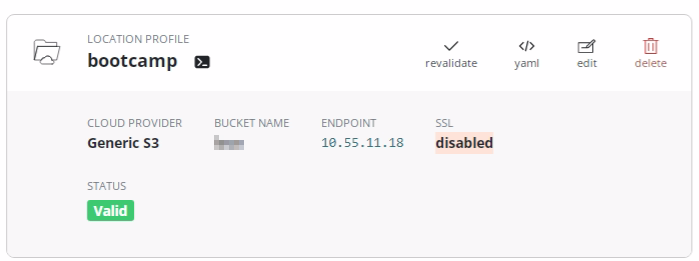
- Save the profile and validate the Status of the Location profile
Create Snapshot and export policy
Now we will create the snapshot and export Policy for our workloads and data.
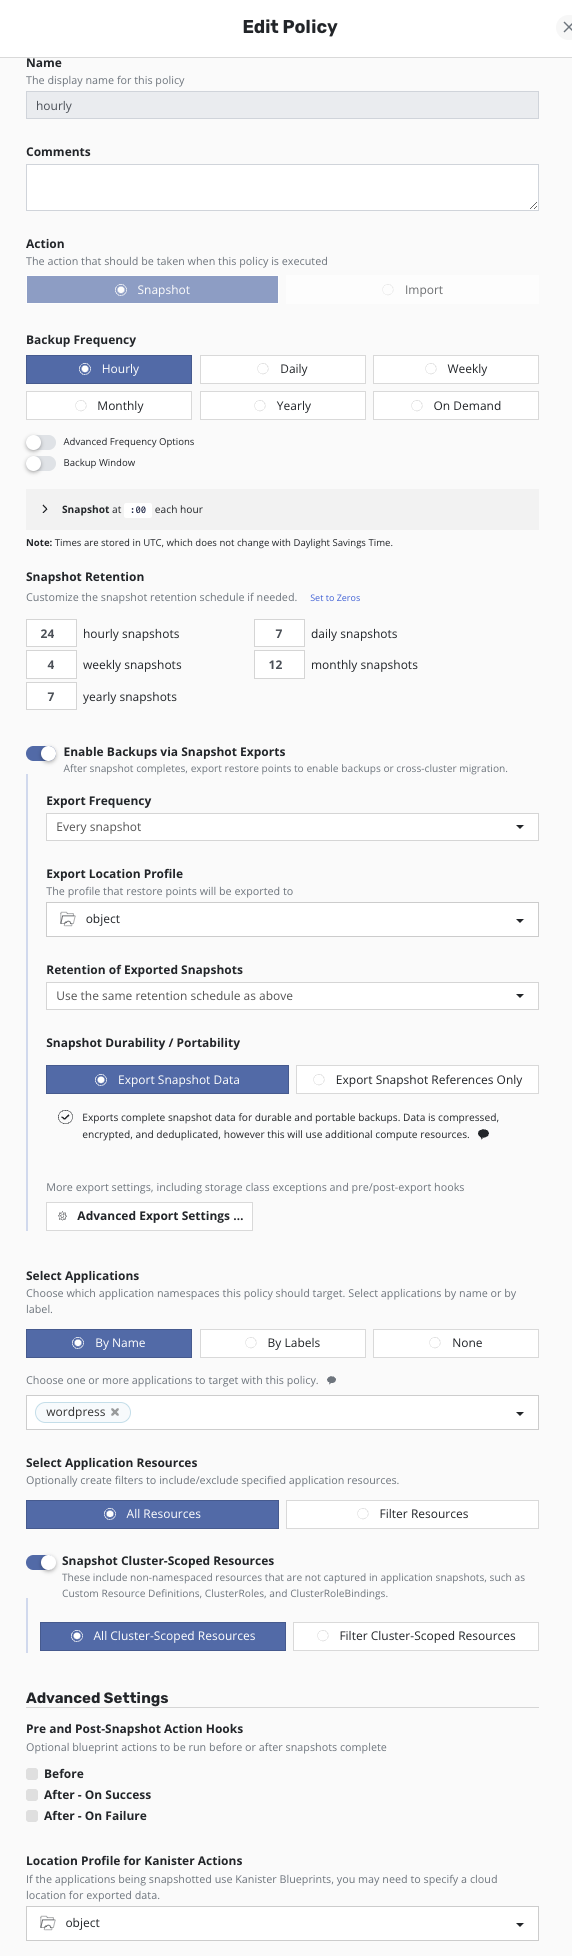
- Go to the main Dashboard, Policies and click "Create new Policy"
- Set a name
- Select "Snapshot" as Action
- Set an "Hourly" Backup Frequency
- "Enable Backups via Snapshot Exports"
- Export Frequency to Every Snapshot
- Export location profile to the value of your previously created location profile
- Snapshot Durability/Portability to "Export Snapshot Data"
- Select Applications "By Name" and then select wordpress
- Select Application Resources to "All Resources"
- Enable "Snapshot Cluster-Scoped Resources" and select "All Cluster-Scoped Resources"
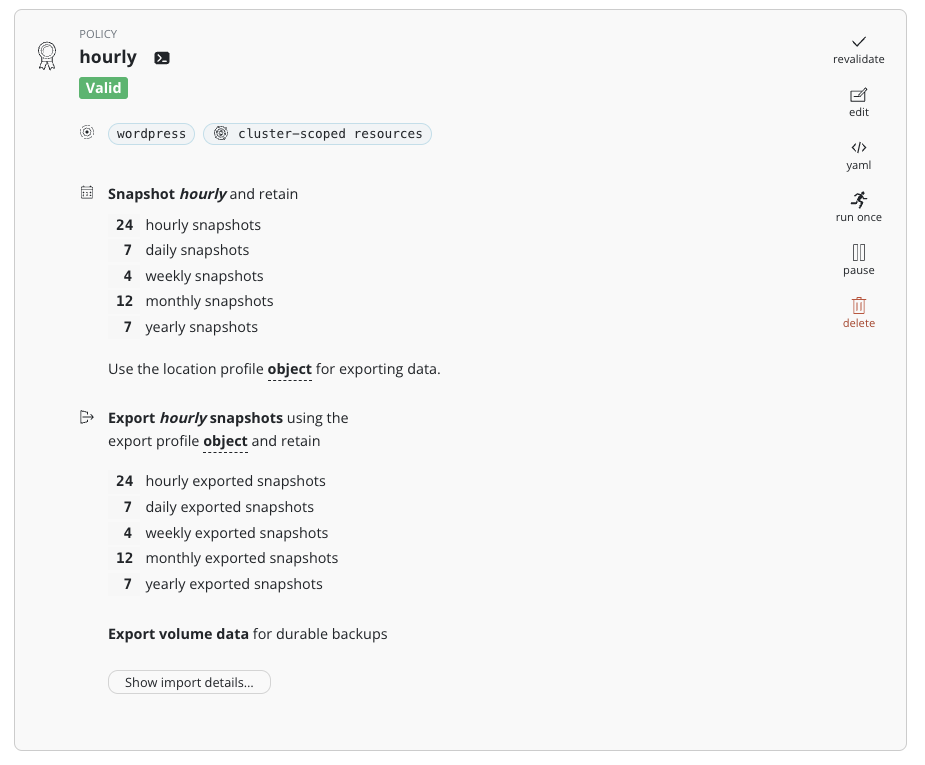
- Create Policy and check that the status is valid It should look like this:
Run Policy manually
On the main dashboard, click on policies Find your policy and click on the run once button, the Run Policy.
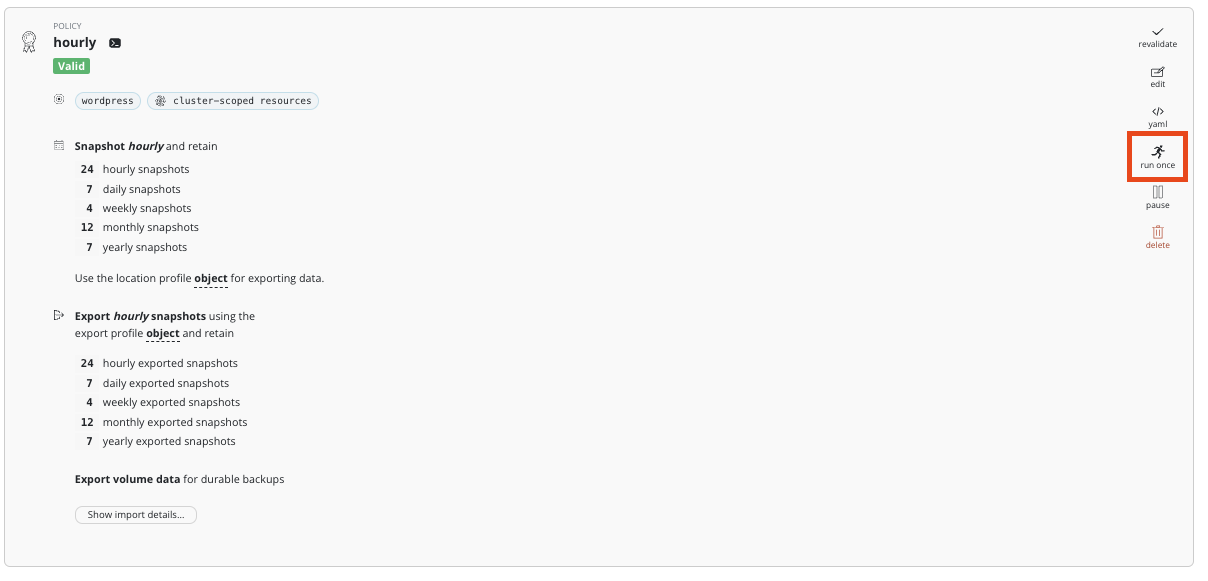 Now go to the Dashboard to follow the activities.
Enable Reports and view Charts
On the main Dashboard
- Go to the "Usage & Reports" dashboard and click on the "Enable Reports" button
- Go back to the Policies Dashboard and "run once" the "k10-system-reports-policy"
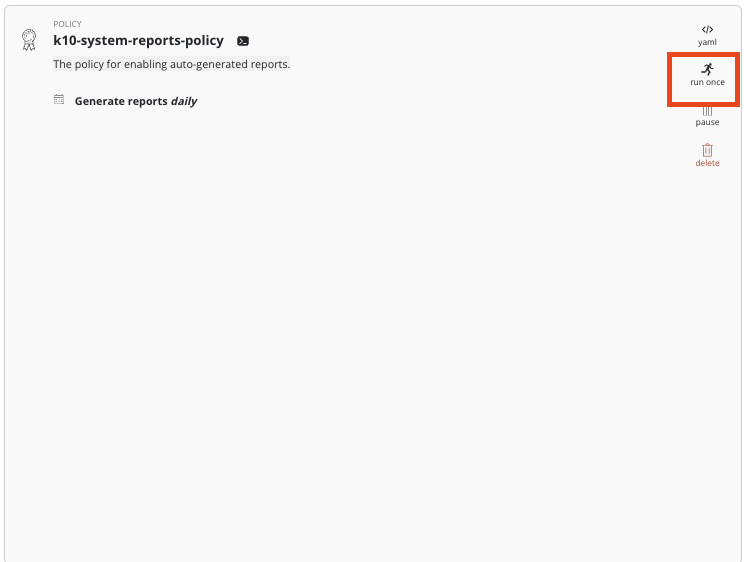
You can now go back again to the "Usage & Reports" dashboard and open "More Charts and Alerts" to view some stats about Kasten.
Workload modification and restore
Play with your Worpdress deployment, adding/removing Page or plugin. We need some modification before we use Kasten to restore the content from a previous snapshot or export.
As we ran once the backup policy, we now have backups of our wordpress application. To restore it:
- On the main Dashboard go to Applications
- find the wordpress application and click on restore
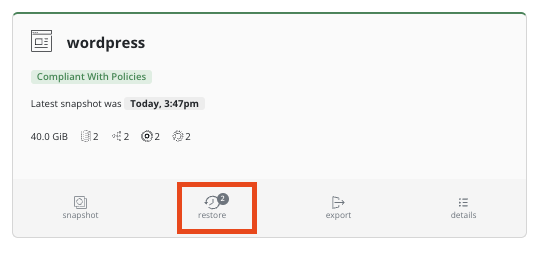
- Choose the snapshot backup (the blue one)
- Let the default parameters and click on Restore
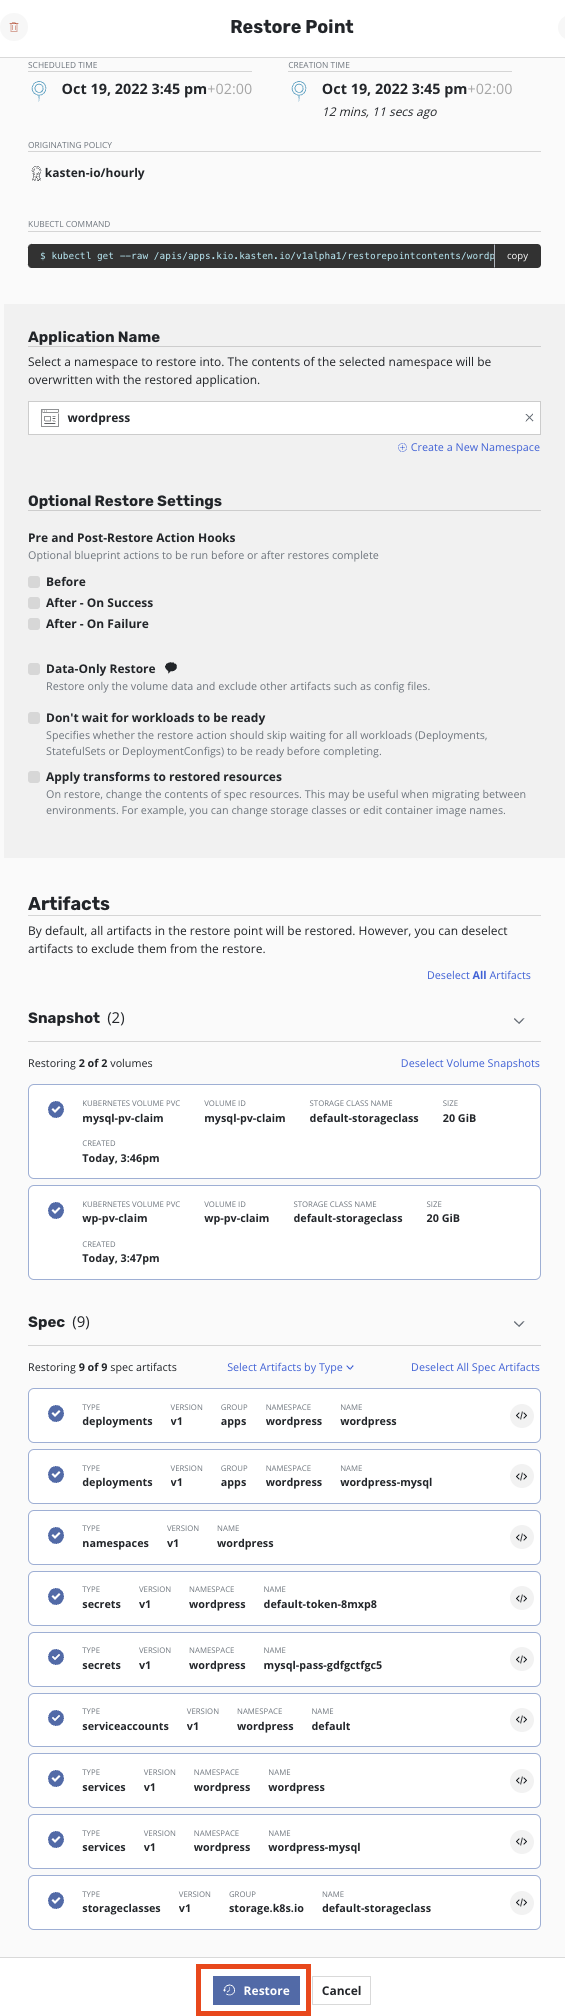
- Go back to the main Dashboard to track the restore process. You can now access again to wordpress and see that your modifications are gone.
Disaster Recovery
Enable K10 DR (On the existing Cluster)
We will now enable the K10 DR Feature.
- Got to Settings, K10 Disaster Recovery and Enable K10 DR
- Choose your dedicated location profile
- Set a passphrase and save it for future usage
- Save the Cluster ID displayed in the K10 Disaster recovery page Run once the Disaster Recovery policy and be sure that the data are exported on the S3
Create a recovery cluster
- Follow the "Create a Kubernetes Cluster" chapter
Recovering K10 From a Disaster (On the recovery Cluster)
- Create a Kubernetes Secret, k10-dr-secret, using the passphrase provided while enabling Disaster Recovery
kubectl create secret generic k10-dr-secret \ --namespace kasten-io \ --from-literal key=<passphrase> - Install a fresh K10 instance in the same namespace as the above Secret, follow the "Install Kasten K10" chapter.
- Provide bucket information and credentials for the object storage location where previous K10 backups are stored
- Restore K10 Backup
helm install k10-restore kasten/k10restore --namespace=kasten-io \
  --set sourceClusterID=<source-clusterID> \
  --set profile.name=<location-profile-name>
Optional steps if still got some time
- NKE scale-out
- Kubernetes Security Tools
- Kubernetes Operational Tools
- ArgoCD
- ServiceMesh
- ChaosMesh
- Nutanix Database Service Operator for Kubernetes
- ERA
Workload Sock-Shop
https://microservices-demo.github.io/deployment/kubernetes-start.html Follow procedure
# git clone https://github.com/microservices-demo/microservices-demo.git
# cd microservices-demo/deploy/kubernetes
kubectl apply -f https://raw.githubusercontent.com/cisel-dev/bootcamp-demo/main/socksshop-demo.yaml